Configuring the User Properties
The User Properties are FaxPress user account settings stored on the FaxPress server. The User Properties can be accessed from any client workstation with FaxPress installed, as distinct from the Personal Preferences settings (see the FaxPress User’s Guide for information on users’ Personal Preferences) which are stored on and specific to the individual FaxPress user’s client workstation.
To access and configure the User Properties, follow these steps:
| 1. | Open FaxPress. (Start>Programs>FaxPress>FaxPress) |
| 2. | Log in as a supervisor to the FaxPress. |
| 3. | Expand the Administration branch. |
| 4. | Select Users to display the list of current user accounts. |
| 5. | Right-click on an existing user account listed in the right panel and select Properties. . . |
| 6. | The User Properties (opened by right-clicking on a user and selecting Properties) contains the same settings as the Add User screen, although it does not contain the Original Settings Based On field. |
| 7. | The Original Settings Based On field appears only in the Add User screen (opened by right-clicking on an existing user and selecting Add), not in the User Properties screen. |
Setting the User Account Properties

The User Account tab contains the basic FaxPress account settings:
User Name – Enter the user's FaxPress login name.
Full Name (Optional) – Enter the user’s full name. This name will appear in the cover pages for outgoing faxes.
Voice # (Optional) – Enter the voice telephone number. This number will appear on the cover page of outgoing faxes. If no voice number is given, the voice number entered in the FaxPress’ Server Settings will be used.
Fax # (Optional) – Enter the fax number for this user's mailbox.
Privilege – Select the user’s privilege level. FaxPress users can have different operating privilege levels. A user's privilege level determines access to faxes and FaxPress functions. There are four privilege levels:
| ■ | User – Can send, list, hold, view, print, save, discard, and cancel personal faxes. Also can create and edit personal phone directories and manage their own print jobs. |
| ■ | Router – Has User privileges plus the ability to view the first page of any fax on the Unaddressed incoming faxes list, route faxes to other users (but not themselves), and delete faxes from the Unaddressed incoming fax list. |
| ■ | Operator – Has Router privileges plus the ability to view, route, list, resequence, and delete all fax or print jobs. Also, can edit the corporate phone directory. |
| ■ | supervisor – Has Operator privileges plus the ability to add, delete, or edit users, set FaxPress' default settings, and print transaction logs. |
Mailbox ID (Optional) – Enter an identifier number. The identifier number may contain up to 4 digits. A mailbox ID is necessary if you want to be able to automatically route faxes to this user's mailbox. FaxPress supports DID, DTMF and T-30 sub-addressing.
PBX Access Code (Optional) – Enter a PBX access code in the field. This password can be any digit string (up to 10 digits long) like 1579.
Description (Optional) – Enter any comments regarding this user.
Priority – defines the user as either Normal, Low, or High priority. High priority users' fax jobs submitted through FaxPress or email gateways are re-sequenced to top of outgoing queue and processed first.
Allow user to change mailbox settings (Optional) – Check to allow the user to modify their own FaxPress account settings.
Enforce Bill Back Code (Optional) – Check to force the user to enter a Bill Back Code each time a fax is sent.
Erase Password – use to erase a user's password so the user can log in and set a new one. When a user’s password is erased, the password will be blank until the user sets a new one. The supervisor can only erase user passwords, not set them. The user must set the password from within the user account.
Setting Outgoing Fax Properties

Use the Outgoing Faxes tab to set users’ outgoing fax parameters.
Time to Send section:
As soon as possible – select to have faxes sent at the first opportunity. This is the default value.
Send on – select a specific time of day to send faxes. The time entry must retain the format of the default setting. You can only set the start time. This feature works on a 24-hour basis and will send the faxes in this mailbox every 24-hours. If you set the starting time earlier than the current time, the faxes will be sent the next day.
After Sending Fax section:
Do not print – This is the default value. Nothing will be printed following a fax transmission.
Print entire fax – select to print each fax after transmission.
Print Confirmation – select to print a notification after each fax transmission. The confirmation will be a single page that includes a scaled down version of the first fax page and transmission details.
Fax Approval section:
If you’ve enabled FaxPress Approval, the conditions requiring approval are displayed here.
Advanced button:

Baud Rate – set the maximum baud rate for fax transmission.
Retries section:
Number of Retries – set the default maximum number of times the FaxPress will try to send faxes before returning a failure message.
Time between – set an interval in minutes between each retry attempt.
Resolution section:
Select a resolution mode for outgoing faxes:
Standard resolution is 200 X 100 dpi;
Fine resolution is 200 X 200 dpi.
Setting Incoming Fax Properties

The Incoming Faxes tab allows you to set users’ incoming fax options.
The When I receive personal incoming faxes section allows you to select forwarding options. Received faxes can be automatically set to forward to another FaxPress user's mailbox, another fax number, or to the members of a corporate phone book group. Automatically forwarded faxes do not remain in a user's mailbox.
Do not forward – Select to have personal incoming faxes delivered to the user's mailbox.
Forward to FaxPress user/group – Select to have all personal incoming faxes automatically forwarded to another FaxPress user or group.
Forward to Remote Fax – Select and enter a fax number to have all personal incoming faxes automatically forwarded to another fax number.
Forward to Shared Phonebook – Select to have all personal incoming faxes automatically forwarded to all the members in a Corporate phone book group. You cannot forward faxes to the <ALL> group, so this group is not shown in the drop-down list.
The Fax section: At least one option must be set. Both may also be selected.
Print Incoming Fax – Select to automatically print incoming faxes.
Save Incoming Fax – Select to automatically save incoming faxes.
Setting Printer Configuration Properties

Default Print Queue section:
The Printer Configuration tab allows you to specify print options.
The Default Print Queue section allows you to select the type of printer device (i.e., printer port or a print queue):
Parallel Port – Select to print to a parallel printer attached to the FaxPress server.
NT Sharable Printer Using IP – If you are attached to a Windows network and wish to print to a network printer, select this option and click on the Setup button to set the printer queue parameters.
The Setup button contains information the FaxPress uses to send print jobs to an NT sharable printer.

HOST Name – Enter the name of the printer’s host computer.
Printer Sharable Name – Enter the name assigned to the printer.
HOST IP Address – Enter the IP address of the NT server that hosts the printer queue.
Login Name – A valid login name the FaxPress can use to access the printer. Using your network supervisor account name and password is not recommended. If the FaxPress cannot, for some reason, log into the print queue server, it will return a failure notice to all users. This notice will contain both the Login name and the password.
Login Password – The password for the login name used to access the printer.
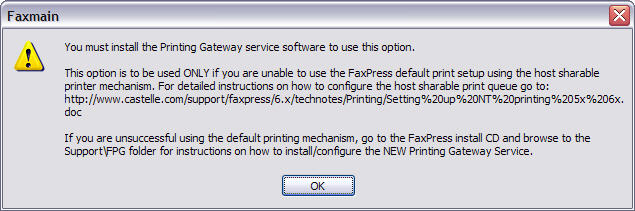
Print via printing gateway – Select this checkbox if you wish to use the Printing Gateway service instead of the local printing options.
Paper in Tray section:
Select the default paper sizes available to the user. These paper sizes options will be available to the user when they print a fax to the default printer. These paper sizes might be different than the sizes offered by the printer. More than one size can be selected.
Scale section:
Choose the scale that you want your faxes printed. When Unscaled is selected, the Resolution section is grayed out.
Resolution section:
For higher resolution in printed faxes, select 300 x 300. For lower resolutions, select 150 x 150. This setting does not affect the native resolution of the stored fax image file, only the printed output.
Printer Type section:
Select the printer type where your faxes are printed. If the printer type is unknown, select Other PCL or Postscript. Most modern printers support either or both of these printer types.
Setting the Archive Properties

The Archive Settings tab allows you to change the location and type for your archive database. The original configuration is set when the FaxPress supervisor configures the FaxPress Archive service. The Archive Settings tab is especially useful when you have moved an old database to different location, but occasionally need to access it.
To select a database, click either Microsoft Access Database or Microsoft SQL server.
Microsoft Access Database – Use this type of database if you do not have a database server.
File name – Enter the database name with path or select Browse to find the database.
Password – If you database is password protected, enter the password here.
Microsoft SQL Server – Use this type of database if you have a resident MS SQL Server.
Connect string – Enter your DSN connect string here. Press Select to bring up the string creator.
Reset to Default – Use the Reset to Default button to restore the original database configuration and location.

The Network Details display user information.
User Directory— This is the location of the users Mailbox on FaxPress the server.
Phone book Directory— This is the location of the users Personal Phonebooks on the FaxPress file server.
Full Network Name— If this FaxPress mailbox is associated with a network user through Single Sign On, the Network Name will be displayed here.
Created Date— If this FaxPress mailbox is associated with a network user through Single Sign On, the date the association was created will be displayed here.
Remove Network Association— If this FaxPress mailbox is associated with a network user through Single Sign On, you can remove this association by clicking on this button.
|
FaxPress WebHelp
Last Updated: 9/12/2007
E-mail this page |
Castelle 855 Jarvis Drive, Suite 100 Morgan Hill, CA 95037 Toll-free 800.289.7555 Tel 408.852.8000 Fax 408.852.8100 |